CelAction 2D Tutorial 4: Animating stuff!
- Michael

- Aug 9, 2015
- 8 min read
Now that we have covered Here are a variety of tips and tutorials more directly related to the actual animation process in Celction.
ANIMATION MODES Every change made to an actor will be recorded in the current keyframe in the Dope Sheet. However, there are three animation modes which determine how exactly these changes are recorded. Along the top toolbar is a button of a stick man in front of a yellow grid. Click this button to toggle between the three modes. Held Pose Mode – (Yellow grid button). In this mode, if you alter a keyframe, it will hold until it encounters or you create another keyframe later in the timeline. Best used when animating chronologically from begining to end. Held Elements Mode – (Yellow and red grid button) Beware as this mode can badly affect your animations if not used correctly. Altering an actor element in this mode will affect the current keyframe and all keyframes following it – even those with pre-existing animation data. Useful if not working chronologically and need to change an entire section of an animation. Edit Single Frame Mode – (Single yellow line on button) In this mode, when you edit a keyframe, a copy of the original will be copied to the frame below, if it is empty. This is a useful safety net as mistakes an easily be reverted.
GENERAL TIPS
EASING
– Easing is an important concept to learn. It makes animated moving objects behave more like their real life counterparts by simulating inertia, acceleration and weight.
Ease in means to Decelerate – i.e to go from moving fast, to slowly being at rest. Ease out means to Accelerate – i.e to go from static to moving very fast. CelAction has a number of functions to automate the easing process which are discussed later in this tutorial.
ONES AND TWOS
– Ones means to animate on every keyframe
– Twos means to animate on every second keyframe. So you only have half as many unique poses per second
– Many animations can be improved by mixing ones and twos – ie slower parts can be done on twos, whilst faster parts can be animated more smoothly in ones.
– Twos is good for coming in and out of rest – it adds more character than an ease in/out, which can again look mechanical.
CAMERA TIP Although walk cycles often have nice timing when they are a mix of ones and twos, if the actor and camera are both moving in the same direction, then any ‘twos’ can have a nasty strobe-ing effect, since the camera will always work on ‘ones’. This is true for any type of animation where the camera pans alongside an actor.
When animating a turn, it is can often look better not to have a frame where the character is pointed straight at the camera. It’s better to go straight from a left ¾ view to right ¾ view.
TWEENING
Tweening, short for ‘inbetweening’ is creating the smooth steps of an animation in between two key poses. For example, if frame one was a character crouching, and frame 10 was him in the air, frames 2-9 would be the tweens showing him jumping into the air.
Tweening can be done manually in CelAction (just like it would be done drawing by hand) but this is time consuming. There are a number of handy tools to automate the process.
1: Interpolate: Select two keyframes then Right Click > Interpolate in the dope sheet. This will fill the intervening blank frames with an evenly spaced animation from one to the other. This can result in a very mechanical result, so should not be used for more than one or two frames for most organic actors.
2: Select frames and press F6 to open the Algorithm panel. Similar to interpolate, but you can adjust various settings such as the easing in and out to make your tweens feel more weighty and natural.
3: Select two keyframes and press Shift + F6 to create a new blended keyframe halfway between them. (Note there must be no other keyframes already between them)
A good methodology is to use Shift + F6 to create key poses at the correct times, then interpolate the smaller moments between them. You can also select all of your twos frames and hold Shift + F6 to interpolate the blank keyframes, effectively creating a ‘ones’ cycle. This will eliminate strobing if the camera is moving.
Algorithms and interpolate are not a magic button to do the work for you – they can make things look too mechanical and flat. So be sure to review and adjust the poses and timing after doing them.
WALK CYCLES
BASIC WALK CYCLE In CelAction 2D, never animate your characters walking on the spot, then moving them separately. This works for game animaton, but not for cartoons!
The process for creating an effective walk cycle in CelAction is as follows: 1: Switch to Edit pose mode (yellow man icon). Create start, middle and end poses for one walk cycle. The start and end poses should be identical. The front foot of the first pose should align with the back foot of the middle pose and so on . 2: Make another frame halfway between start and middle – move this into position manually. Do not interpolate it with Shift + F6 as the movement is too large. Then do the same halfway between the middle and end frame. 3: You can now select the frames from one keyframe to the next (inclusive) and use Shift + F6 for the remaining between-frames to interpolate the approximate movement. 4: Adjust these as necessary, activating Edit elements mode (red man icon) so that any adjustments will carry on to following frames. 5: If the feet are jiggling around on the floor, you can select one, select the frames it should be static, right click and select ‘lock in place’ to prevent them from sliding about. Note that this will likely cause errors at the ankle joint, but these are easier to hide.
COPYING AND PASTING A WALK CYCLE 1: The first and last frames of the walk cycle must be completely identical, so make sure they are before continuing. 2: Select all relevant frames in the chosen actors Dope Sheet. In the taskbar choose Automate > Animation Clipboard > Copy 3: In the Hierarchy window that pops up, select from the Hips down, select the Family option, and press ‘Copy’. (NB This assumes that all parts of the body parent to the hip, before being parented to the Roots. We don’t want to include the roots – just the body parts). 4: Select the last frame in the existing walk cycle, then choose Automate > Animation Clipboard > Paste from the taskbar. 5: In the pop up window, choose ‘Keep Existing Values’ in order for the second cycle to start where the first leaves off, rather than reverting back to the walks origin point.
MOTION PATHS
Motion paths are line paths that actors can be set to automatically move along. They are created just like other actors but are not visible on screen. They are created with control points which allow you to alter the length and curve of your path
MAKING A MOTION PATH 1: Enter Build mode 2: Click the New Actor Button 3: In the taskbar, click Element > Create > Path > Add 4: In the first popup window, type a name for the path and click OK. 5: In the second window, Check ‘Stroke’ and uncheck ‘Fill’. Change the path from ‘Closed’ to ‘Open’ and choose the number of control points you want. 6: Click OK to add the line.
DELETING A CONTROL POINT 1: Choose the control point you want to delete in the object Hierarchy, then click the Modify button at the top of the panel.
2: In the window that opens, choose the point again and any children attached to it. 3: Click the Remove button and choose elements from the dropdown bar. 4: Finally, click ‘Yes’ in the final popup window.
NB: Never delete the start or end points of a line as this will screw up the element. Only delete lines in the middle of the path.
BRINGING IT INTO THE SCENE 1: Back in Animate mode, in the Taskbar choose Level > Create > Motion Path. 2:Choose the path you want to add from the list of actors and click OK. 3:You can freely position the control points of the motion path – Each control point has 3 properties; its position point and two tangent handles to alter the curve of the point.
NB – The control points of a motion path can be parented to elements of other actors, to create dynamic paths that will change as the other actor s animated.
MAKING AN ACTOR FOLLOW A PATH. 1:Set your path up as required, bearing in mind that the animation will always start at control point one, and finish at the final control point 2: Select the actor you want to follow the path, then select the required keyframes on the Dope sheet. 3: Right Click and choose ‘Path Movement’. 4: In the Dialogue box, you can check whether or not the actor will rotate along with the curve of the motion path. You can also adjust the movement and acceleration speed of the actor for the duration of the movement. 5: Click OK and the actor will now follow the path.
ATTACHING A DOG TO A KART
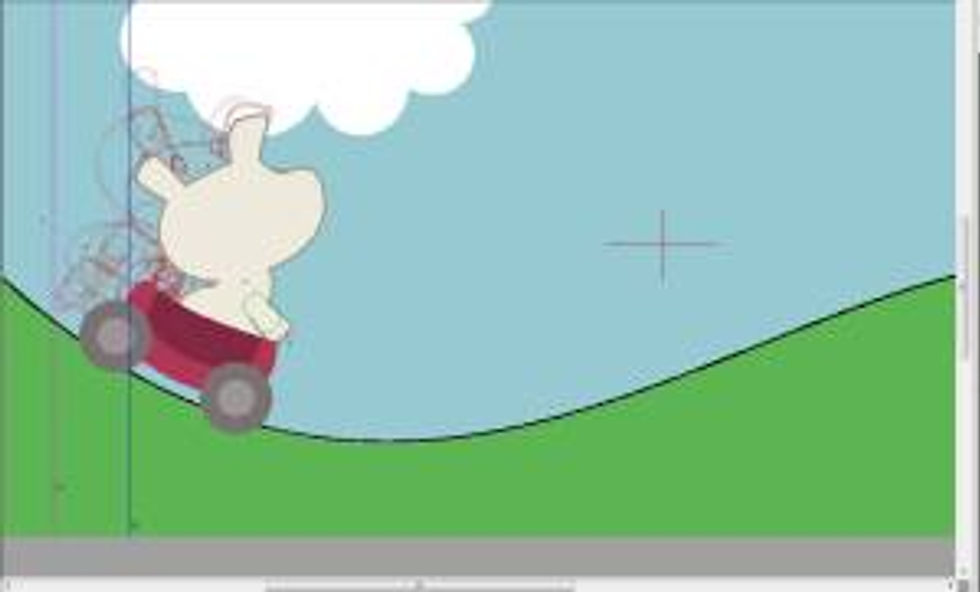
Image Courtesy of King Rollo Films
This details how to animate two actors together. In this case, a dog is sitting in a kart and the kart rolls down a hill (following a motion path – see above). Therefore, the dog should follow the same timing and movement of the kart. It could also be used for a man driving a car, a monkey holding a banana etc.
1: In this case, the dog will be a child of the kart. Animate the dog first – waving its arms, blinking, wagging its tail etc. 2: Set the actors into the correct layer order (i.e. put the dog behin the kart actor, so it looks like it is sitting inside). 3: In the grey frame number column of the dope sheet, select the frames you want the attachment to be active. 4: Right Click and choose Attachment Links > Set or press Alt +A. This will show two lists of all actors in the scene and their elements. Choose the required elements of the dog actor from th eleft list. (Use the ‘family’ button to make this easier). 5: Choose the Kart in the right column, then click the ‘>’ button. This will move the dog’s hierarchy to the new actor. Now click ‘Set’ 6: The dog will have a lot of frames applied to its dope sheet. These can be deleted and the dog will now follow the kart.
7: Once you are done, to remove the attachment links, Open the Attachment Links window again. This will show everything in its default place. Click ‘Set’ to accept this.
NB – Actual Keyframe movement values for the dog arent set until you unlink attachments. NB – Just like with reverse attachments a duplicate safety frame will be added after your frame selection. Dont delete this until you have removed the attachment link.
EFFECTS CelAction has a number of built in effects such as Masking, colour correction, blurring and shadow casting. These can be used instead of adding effects in post production.
To open the effects list, press Alt + E, or right click frames in the Dope Sheet, and select Effects > Add There are two parts to every effect – the target, and the affect itself. First, select your target, Click New to open a new window, then Target > Target Family from the dropdown list of effects. Click OK to close this window, then click New Again. This time choose the effect you want.( For example, choose a mask, then the source of the mask, clicking apply any time it is necessary). With the target and effect chosen, click SET.
In order to view effects in the preview window, make sure the FX button below the taskbar is set.
Any keyframes which use effects will have a blue star icon by their name.
CREATING GUIDE LINES
Create Horizon Lines/ Floor lines To create lines that will not render in the final animation, 1: In the taskbar go to Level > Create > Guide. 2: Choose Line guides, and choose the colour you want for the line. 3: You can adjust the angle of the line. 4: At the top left of the Scene viewer is a view guides button to switch them on and off.

Comments