DIGITAL COMPOSITING – Green Screening (Keying) in After Effects.
- Michael

- Oct 25, 2013
- 4 min read
Note – this is an older tutorial. A more recent one with newer information is available here: https://michaelarbuthnot.wordpress.com/2016/10/11/digital-compositingweek-3-tutorial-keying-and-green-screen/
SETTING UP THE GREEN SCREEN.
-When using green screen techniques, we film actors in front of a large green cloth screen then use a technique called keying to remove the green portions of the image.
-Bigger is better. You have a bigger range of motion when your screen is larger.
– Stretch your green screen and hold it in place with duct tape to help Eliminate any wrinkles, which can cause shadowing, making the keying process more difficult.
– Keying works by removing a particular hue from a piece of footage and making it transparent. Shadows appear as a slightly darker hue and therefore do not get removed.
-Use keylights on people to match the lighting with their intended background, and use backlights on the green screen itself to eliminate any shadows which might interfere with the keying.
GREEN SCREENING IN AFTER EFFECTS
-Create a video, using the tips above. Planning is key. Know in advance what your shot should look like and film each element accordingly. For this example we are just practicing techniques, but for a real shot you need to angle and light each piece of footage correctly so they blend together correctly.
-Make a new composition at the same size and frame rate as your source video, then drag in your footage.

The first step is to mask out all the non essential parts. click on your video layer, then click the pen tool, then draw a selection around your object, but still inside the border of the green screen.

-In Effects and Presets, choose selective colour. Choose cyan and yellow and take them up to 100, and magenta down to 0, to boost your greens and eliminate a lot of the shadows. For older versions of after effects, use Effects > Keying > Hue and Saturation to boost the greens. This is less effective however.
– With your video layer selected, choose the Effects > Keying > Keylight 1.2. On the effects properties panel click the little colour dropper, then choose a midtone green from the greenscreen. Now much of the green screen will be removed.
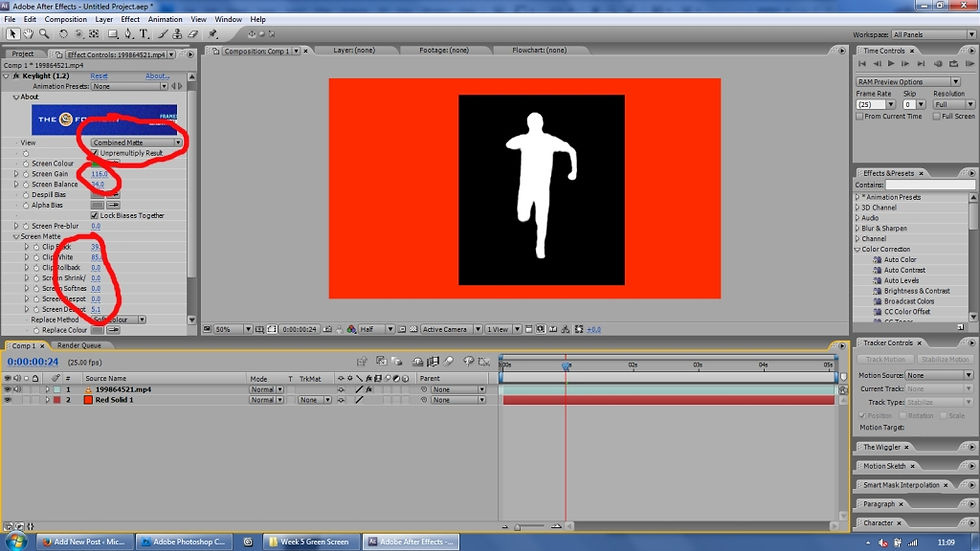
– Go to Layer > New> Solid and make it a bright red or pink. drag this layer underneath your footage and you will see that there are artifacts left over from the shadows on your green screen:

– In the Keylight properties window, View: Combined Matte is a good way to view your keylight during editing. This will change the image to black and white. Black is transparent, white is visible. For this, you want to have everything black except for the object you were filming.
– To fix the shadowing, you can play with several options in the properties window. You can turn Screen Gain up slightly (try to avoid going above 115%). Screen balance can be turned down slightly.
Screen Matte > Clip Black, Clip white and Screen despot can all be adjusted to match the balance between black and white.
Switch back to your View: Final result in the keylight properties window. By now you should have a fairly clean image. We now want to place a background behind our keyed footage.
NB http://www.clipconverter.cc/ is a good website for downloading youtube vids to your computer. obviously beware of copyright violations etc.
For this example, I got a green screened explosion off youtube. Again I applied keylight to remove the green, then I placed this underneath my running person layer so it appears behind. Finally I used a photo of a jungle to place these elements in. Obviously live action footage on top of a phot is kinda fake looking, but for training purposes it’ll do!

How to add to it:
Green screening correctly takes a lot of preparation and can take hours of tinkering to make everything look right. Here are a few quick tips to make your composition look more realistic, and to give it more pop:
ANIMATION: For this example, I scaled down the running character and positioned him in the background. Then transformed his size and position to make it look like he was running towards the camera.
SHADOWS: Finally, you may wish to add some shadows underneath your person, especially as the explosion is happening. Duplicate your person footage with Ctrl + D, and flip it vertically. Set the levels of this layer so that the image is completely black, then drop the opacity. Place this at the feet of your character and keyframe its position if needs be. You can add a skew effect to make it look like it changes direction when the light from the explosion hits you.
WIGGLE: Use the Wigglerama effect to make the camera shake when the explosion takes place. As you can see in this example, my image wasnt large enough, so black borders appear around the edges as it rotates.
COLOUR OVERLAY: Create a new solid layer and go to Layer > Blending modes > Overlay. Turn the opacity down to around 30% to give the whole scene a coloured overlay when the explosion lights up the environment.


Comments