DIGITAL COMPOSITING: HDR Lighting
- Michael

- Oct 26, 2016
- 5 min read
HDR Light mapping is a technique used to get accurate lighting results when putting 3d models or characters into a photo or video scene. By taking photos of a chrome ball, you can take the reflection data, do a bit of magic to turn it into lighting data, and apply this to your models, to make them look like they belong in your scene.
Here is a short document explaining the process:
TIPS:
– Take a range of photos at different exposures, from very dark to very bright.
– Remember to take a photo/video of your scene without the chrome ball as well! This is the one we’ll composite our stuff into! Give this a natural exposure.
– Raise your chrome ball off the ground by using a tripod, and take photos that are level with it, as well as ones from the required angles.
*get matchmover
Setting up your HDR map in HDR SHOP.
1. After taking your photos, Go to Create > Assemble HDR From Lighting Sequence, then click the Load images button. Choose the necessary images.
2. Hit Calculate, then Generate Image. you can zoom in and out with Ctrl and the – or + keys. Draw a circle around your chrome ball then Image> Crop. (Go to Select > Draw options > Circle)
3. Image> Panorama> Panoramic Transformation. In the window that appears choose Format: Longitude/latitude.
4. Hit Calculate, then Generate Image. This will stretch out your ball into a rectangular image.
5. File> Save as > Radiance/ HDR file and choose a file name.
Bringing it into 3DS Max.
1. Open a new max file, and assign the Mental Ray renderer in your render settings. Change Render size to the same as the image you wish to composite to image.
2. Go to Rendering> Environment and in the background box choose Map>Bitmap. Choose the chrome ball image from your sequence that best reflects the natural lighting of your scene.
3. In your perspective viewport, at the top left where it tells you your preview shader, click where it says ‘Realistic’ or ‘Shaded’ or whatever it may say. Scroll down to the Viewport Background option, choose Configure Viewport Background. Check the fourth option ‘Use Files’ and in the panel below click the files button. Choose the image you have set for your render environment.

4. Rotate your perspective grid to match the angle of the photo. This is why we take our photos level with the chrome ball- we can now set our grid flat on screen,
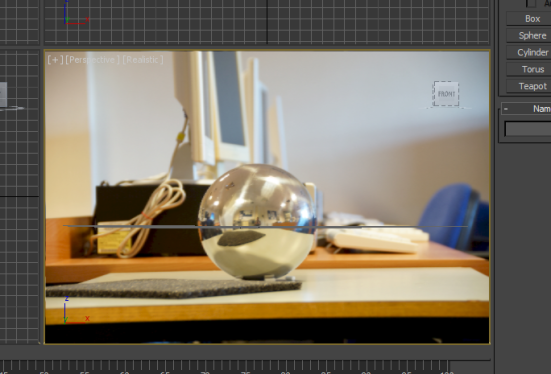
5 – Draw a sphere so that it appears on top of the one in the photo. Open your material editor, choose a new material and set ambient and diffuse colour to black, and glossiness to 0.
6 – Map>Reflection> Bitmap and choose your HDR image. This will open a new window. Slide the black point and white point to match your natural lighting. In the internal storage section, select 16 bit. Now you can see in the thumbnail the white damp and black damp. try to minimise areas of black damp, but dont eliminate completely.

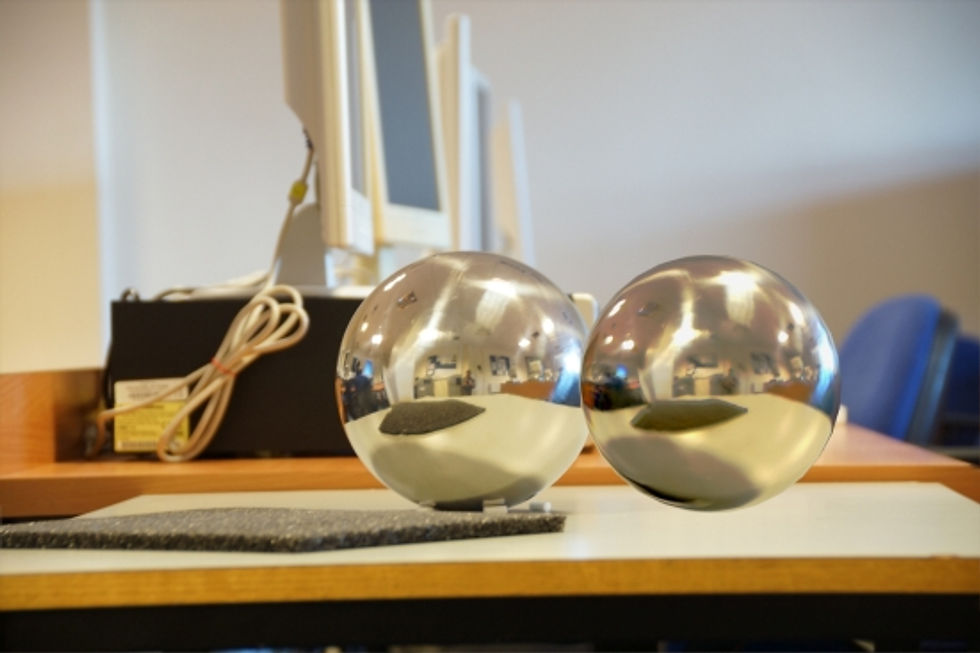
7. Apply this material to your sphere, move it slightly to the side, and render a small image. You can now see how your hdr map sphere matches up to the real one in the photo.
HOW TO TWEAK YOUR HDR MAP
You will probably need to adjust some settings to make your sphere look correct.
– Make an instance of your reflection map, by dragging the map into an empty slot in the material editor. Now, if we need to make a change to the map, do it from this slot. Pro tip- in the material editor- a flat square image is a map, but one that appears as a sphere is a full shader.
– You can go back into your map and adjust the white point/black point settings.
– In material editor’s output settings, you can change the output amount.
– Never adjust the colour of the material itself- just the HDR map.
APPLYING THIS TO OTHER OBJECTS/PHOTOS.
Now we have fixed our HDR map, we want to switch our environment image to one without the sphere.
Change your renderer> Environment image, and your viewport> background settings to a new image. We can also Hide or delete our sphere. Its served its purpose in helping us match our maps together.
Align your perspective grid to be in line with the surfaces of your photo. Useful utility – Perspective Match > vanishing lines – show vanishing lines. Line these up with perspective in the image to automatically adjust your camera position for still images.

Create a plane that will be your surface, and create a sphere on top of it. Apply your material with the HDR data.
Create a new material of type Mental Ray, Matte Shadow Reflection, and apply this to your plane.
Adding shadows and reflections to the plane.
Go to lighting panel, and choose standard lights, skylight. In the skylight parameters, drag the HDR map from material editor into the map slot for sky colour.
There is also a section marked ‘Reflections. Check the ‘Use reflections’ box to have your objects reflected in the plane. You can Use the falloff controls to make the reflections fade off with distance. Changing the reflection colour from black to white will determine how weak or strong the reflection is.
How do we get the teapot reflected in the sphere as well?
Create new material for sphere. Go to maps and change reflection to raytraced. In the raytrace maps, drag the HDR map into the background slot. Now the teapot, as well as the environment mapping will be rendered.
if your object is showing the background through the shadowy areas, select the plane, right click and choose object properties. Uncheck the visible to Reflection/Refraction box.
BACKGROUND ENVIRONMENT SWITCHER.
When using certain materals such as metallic car paint you cannot add your own reflections and Max will try to calculate them itself by looking at your environment map – this can give a ‘see through’ effect as the object flatly reflects the environment map behind it.
You can trick Max into using the correct reflections by going into the original environment map and switching it from a bitmap to an Environment/ Background Switcher Mental ray material and Keeping the old map as a sub map. In the switcher parameters you can now drag your hdr map into the environment/reflectors colour box.
TIPS
Ctrl + C Add a camera wherever the perspective viewport is looking.
To speed up renders by only re-rendering parts of the image which will have changed, open your render window and choose ‘Area to render: Region’ and draw a rectangle around the part you want to render.
H – Bring up list of objects in scene
Ambient Occlusion– the thin shadows that appear between two touching objects.

Comments