Tutorial: ZBrush – BPR Rendering and Post Processing.
- Michael

- Jan 20, 2016
- 5 min read
Zbrushes internal rendering engine is a great tool for producing fast renders of your sculpts. Detailed below is a quick overview of how to set up and render great looking still images for your portfolio
This is noted from several sources, including a great little tutorial video by Liam Shaw
Setting Lights

In the lighting menu, you can add lights by clicking on the lightbulb buttons – active lights are highlighted orange. Click and drag the orange dot over the sphere to set the direction of the light. Click on the dot to set whether it is in front or behind the sphere.
In light Properties you can set whether lights project Shadows or Ambient occlusion.
It is also advisable to set Ambient to 0, so that a light source only affects where it hits the model, rather than simulating being bounced around the environment. This gives the effect of giving our lights and shadows more definitive boundaries, which is useful when compositing later.
Locking Camera
You might accidentally rotate the camera whilst working, which will mean individal render passes might not align correctly. So to prevent this, we will set up the camera position as a keyframe on a timeline, which we can come back to later if we accidentally move.
1: In the taskbar, click Movie, then Timeline, then Show. This will add the timeline along the top of the screen.
2: Simply click on the timeline and a new keyframe will be added with a record of the cameras position. Move elsewhere on the timeline to prevent you from editing this keyframe, then anytime you accidentally move the camera you can just go back to this position.
Setting up renders


1: Open the Render Palette, then render properties. Check which options you want to include, such as Shadows Ambient occlusion etc.
2: Go to the relevant sub palette to further refine each of these options – for instance in teh Shadows palette you can adjust the blurriness and angle of your shadows.
Rendering
1: Go to Document up in the top Taskbar and set the size of your desired render then press Resize.
2: Drag your finished tool onto the scene and rotate it into the desired position. It is important now that you don’t move your camera.
Quick method
(The next two steps let you produce a quick base render without exporting flat colour passes or Shading passes. This is useful for models constructed of just one flat material. If you want to do the full detailed process, skip to stage 5.)
3: In The top Taskbar, click Render > Best. Underneath is a Render settings panel where you can make further adjustments.
4: Once the render is complete, go to Document > Export in the top taskbar. Your image will default as a psd file. This will be your base render going forward.
You can now follow the rest of the steps below, but without needing to separately render the various Shaded Passes.
Detailed Method
5:Make sure your lights are in position.
6: In the render menu, There is a section for BPR. Make sure the ‘Create Maps’ option is checked – this will allow you to generate different passes used to composite your image later, such as shadows, depth, occlusion etc..
Either from the BPR Renderpass palette, or from the Right Toolbar, Click BPR button, which will create you a new render. It might look kinda crappy, but you will see several passes have been generated. Simply click on any of the thumbnails to save it out as a .psd file.
7: You will likely want to create several render passes – this can be done by simply clicking the BPR button for each lighting position and saving the thumbnails.

The renders youwill want to include are:
Shaded: One or more renders containing the lighting and polypaint data. Move your light to different sides to generate the effects of Key, fill and Rim lights.
Shadows. The darkened areas that each lighting position cant reach. These can be combined later in photoshop. For every Shaded pass you should also render out the associated shadow pass. NB: Even if you have enabled shadows, in the renderer, you will only generate a pass if your lights are set to project them.
Ambient occlusion: Certain parts of a model such as corners or creases recieve less less light from the surrounding environment. This pass will capture that difference.
Mask Pass: This simple pass w
ill render all parts of your model as white, and all empty space as black. This is useful for making selections in photoshop later.
Depth: This pass uses gradients between black and white to show which parts of the 3d model are closer or further from the screen. This can then be used in compositing later to apply depth of field effects.
Sub Surface Scattering: This pass will simulate the light that passes through semi transparent membranes such as skin.
Reflection Pass: This will help gather all those glossy highlights that might appear in parts of your model. To create a reflection pass, deactivate any polypaint data in your subtools, set the material to ReflectiveMat. (This defaults to some funky chrome colours – thats fine). Run BBR again and save the shaded map, naming it reflection.
NB: When rendering, you may generate several shade and shadow passes to play with in photoshop, but you will only need one Depth, AO and Mask pass for any image.
8: If you want to create other shade and shadow maps, Move your Light to a new position then repeat the previous steps to generate maps from these angles.
Post Processing in Photoshop
1: Open Photoshop and open any psd render images you created – shaded, shadows, AO etc. Add all passes into one file, with the basic render(s) at the bottom.
NB – If you render out several ‘shaded’ passes (i.e your lights) you can set them to screen, so that they will be additive and can be combined.
2: Add the ZDepth pass as a new Channel in the channels panel.
3: Use the magic wand tool to select and delete the background of the base render, leaving just the model. Next, add a new layer underneath and fill it with a background colour.
4: Set your shadow pass layer modes to multiply and adjust the opacity as necessary. A nice effect is to colourise them so that they have a slight colour tint, rather than being completely black – this can tie the image better into any environment you put it in. This isn’t necessary if your image is monochrome however.
The same goes for your light layers colourise and duplicate them to make them brighter or different tones.
5:Render > Sharpen More can make your base layer Pop a bit more if there is lots of fine detail.
6: Adjust your levels (Image > Levels) to make your contrast better.
7: Optionally, add a Noise layer to add a little bit of realism to your image. Start with a black layer and add a noise filter, set to monochromatic. Play with the layer modes and opacity to make the effect more subtle.
Depth of field using ZDepth pass.
As a final touch, to get some nice depth of field in your rendered image, we will make use of the depth pass which we previously saved in our channels list.
1: Duplicate all layers as a backup, then merge the new set into a single layer, and hide the originals.
2: Add a Filter > Lens Blur to the image, and in the menu that pops up, set the Depth Map Source to the channel that contains your depth map.
3: Click any point on the image, or adjust the Focus point slider to change which areas are in focus and which are blurry, then adjust the radius slider (which will simulate the aperture of a camera lens) to set how strong the blur effect is.
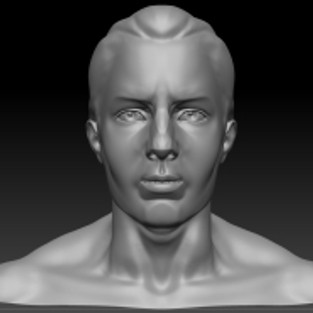
Example
Here is the default head tool that is included with Zbrush. By doing a few shadow passes from different directions, An AO pass and a Depth pass, we can take it into Photoshop and create something a little more dramatic. Note that this image is very heavy on the depth of field, and is also without rim lights:


Comments