DIGITAL COMPOSITING: 3d Camera Tracking with Matchmover.
- Michael

- Oct 18, 2016
- 4 min read
Matchmover is a free piece of software from autodesk used for tracking footage, to be taken into a 3D package such as 3DS Max or Maya.
Tips for gathering footage:
– When filming the video you want to track, be sure to have high contrast points which the software can track- for example, a post it note on a table, or coloured tiles on a floor. You will need to know the distance between these.
– Plain white walls are no good as there are no contrasting points for the software to track. Tiles are great as the corners where the connect make good track points, and the grid shape is useful for aligning your co-ordinate system. Carpets with busy patterns can be a pain as they have too many similar patterns which the software can mistake for each other.
– If you place an object such as a post it note, you will need to remove it later. This can be done by adding a plane with the texture of your surface in your 3DS Max scene, to cover the area of the raw video footage.
– Well lit areas can be difficult as hues are bleached out, making track points hard to follow.
– Keep your camera steady when filming. It will make it easier for the software to analyze frame by frame.
-Some shots just wont track well and will need to be reshot.
Automatic tracking in Matchmover
-Matchmover can either automatically track footage, or you can do it automatically – this is easier but can take a little longer depending on your footage.
– Matchmover wont accept certain file types straight out, so first send the footage to After effects or Premiere, put it in a new composition and output as a .png sequence. Choose no compression in the render settings- we want it as crisp as possible.
– In Matchmover, go to File> Load Sequence and choose the first of your .png shoots you just made from after effects
– Hit f10 to open the ‘Automatic 2D Tracking’ window. Hit settings in the box that appears and slide your track point density as required. usually keep the slider in the middle so there aren’t too many track points for Max to handle. Obviously, your hardware will determine what the software can handle, so keep that in mind.
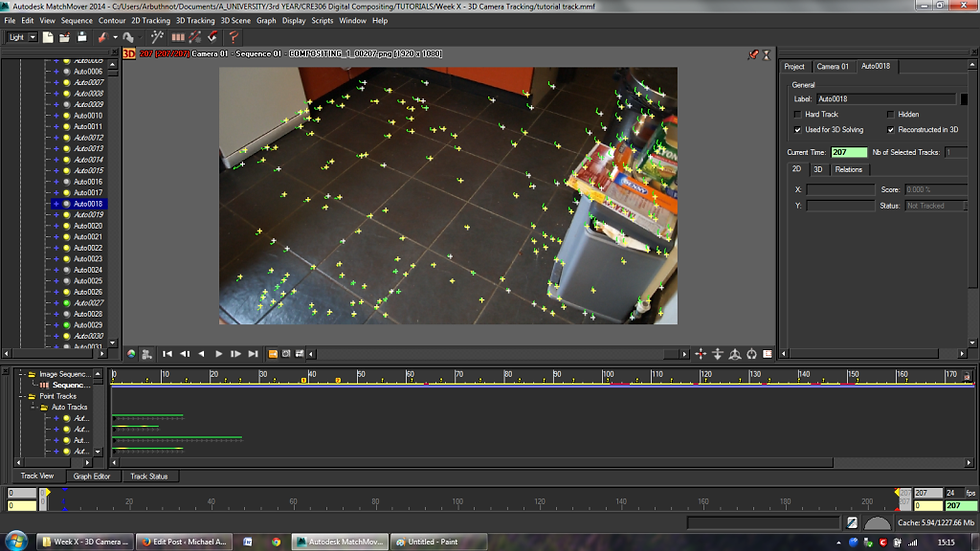
It may take a few minutes but you should see little crosses with green tails appearing all over you footage as it tracks.
Setting a Co-ordinate System
Right now all the track points will correlate to a 3d scene, but this scene has no scale or orientation. If we were to import it like this, a chair could look like its upside down and a mile long! We can sort this in Matchmover.
– Since we are working in 3DS Max, we need to work on the same axis system. In Edit> Preferences> Display, set ‘3D Up Axis’ to Z. This is what it defaults to, but check it just to be sure.
– Go to Window> Track to show a timeline of the tracked data. Long green lines are good. Green means its a good track, and the longer it has tracked for, the better. Look for decent track points with long green timelines. Take a note of their id numbers- good old pen and paper is handiest for this.
-Go to 3D Scene> Co ordinate Systems. set the origin point as your good track point.
-You need to set in the distance for between two points, based on the size of an indicator in your scene. for example, in this case the floor tiles are 30cm apart, so pick two points that are the same distance as a floor tile and enter them in the relevant boxes panel on the right.
-Next you must set up your X and Y axis by choosing points that match those axes in your track. find 4 track points that sit at right angles to each other, or pick points that connect to your origin point at right angles.
– When all this is done, click the ‘Apply Coordinate System’ button, then at the top left corner of the footage viewer click the little’3D’ square button and it will change to 2D.

-When you get a decent track and have set up your Co-ords, export as a max script (.ms file), with settings to animate the camera. Save the Matchmover file as well- if the track wasnt as good as we hoped we may need to come back to it. Otherwise we can now shut down Matchmover.
-After opening a new scene in 3DS Max, go to Max script > Run script then choose the one you just made. Press C to activate the camera that the script creates- this is the camera we want to render from.

Setting up your render environment in Max
-Set your viewport background to the source video to model on by right clicking the ‘Realistic’ text in the perspective window and clicking Configure> Background>Use files and then import your png sequence. Tick the box labelled ‘Animate background’. In the files window be sure to click the sequence checkbox.
Next, go to Rendering> Render Setup> Environment and set your png sequence as the environment. Again, check the sequence checkbox. When you render a frame, the environment may not display correctly. This is usually because it defaults to be spherical. To fix this, open your material editor, and drag the environment map onto a new slot and click the instance tab in the window that opens. In the co-ordinates setting, set mapping to screen. This should Flatten it out so that it appears properly.

Now we want to test how good our track was. create a simple box or two and place them on the floor, and render a very small video. To hide all the little tracking dots whilst modelling, Go to ‘Display options’- the 5th tab in the create panel, and check ‘Hide Helpers’. Even at low resolution, you should be able to check if the models skip in the video or if they sit properly.

Assuming your track was successful, the next step is to add HDR lighting and more detailed models, textures etc to make a more realistic looking shot.

Comments