Tutorial: Unity Animation 2 – The Animator Component
- Michael

- Jul 23, 2015
- 6 min read
This post contains notes on Unity’s tutorial video series, pertaining to the Animator component of the Animation System. 1: THE ANIMATOR COMPONENT
The animator component binds Unity’s animation system to a game object. There are several properties in the Animator component, editable via the inspector panel. Controller: The controller is a Unity-generated state machine that determines which animation is being played at any time whilst the state is running. *NB: Controllers are separate objects in your project folder which are referenced here.
Avatar: The Avater is a unity generated asset which contains the data of the skeletal rig of a 3d character object. This is the ‘glue’ which ties the model to the animator component. For objects without skeletal rigging, avatars are not required.
Use Root Motion: If you create an animation of a character running in a line, compared to running on the spot in your 3D package, you can check ‘Use Root Motion’ to have the character move that same distance in Unity. Without checking it, the character will run in place, and any movement (transformation) will be applied via script. Animate Physics: If whatever you are animating has a rigid body, check the ‘Animate Physics’ button, to have your animator work in time with the physics engine. Culling Mode: Has two settings- ‘Always Animate’, in which case objects will be animated even when they are off screen; and ‘Based on Renders’, in which case they wont be animated when off screen, which improves efficiency. Both will allow the root motion to be calculated, so that if a character moves offscreen and you turn to face them again, their path of motion will have continued correctly.
2: THE ANIMATOR CONTROLLER
– This component contains state machines that determine which animation is being played. These are controlled by parameters, which get their values from scripts. Controllers are separate files held in the project folder. They are then attached to an objects Animator Component in order to be utilised.
– Click Create > Animator Controller in the project window to create a controller Controllers are Edited via the Animator window. Double click on a controller to open this window. Note that this is different from the Animation window! In the gridded space you can drag animation clips from your project folder to create new states. Or you can right click and choose Create State. The first clip dragged onto the window will turn orange and become the default state. Therefore for characters, ‘idle’ is usually a good choice. Alternatively, you can right click any other state and choose ‘Make default state’.
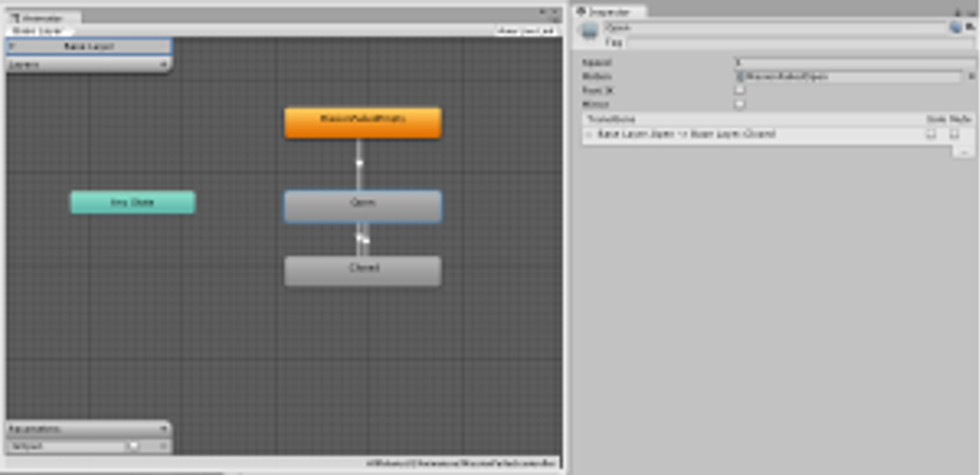
When a state is selected, the following options are available in the inspector panel: Name/Tag: the name of the animator state which can be referenced in scripts. Speed: The speed the animation will play at, relative to its imported frame rate. The default value 1 means it will play at normal speed. Motion: The animation clip being used. Will automatically be filled when you drag a clip onto the state window. Foot IK: Will reduce or eliminate any foot slippage in your animation. Mirror: Flips the animation from left to right. Transitions: Allows the blending between one animation and another, for example ‘idle’ to’walk’. To create a transition between states, right click on a state, choose ‘Create Transition, and then drag the connecting arrow to the relevant state. note that this is one way- you will have to create a separate state to make the transition work in reverse. You can name your transitions to make them easier to reference. Mute and Solo are used to deactivate transitions purely for bug testing purposes, and should not be activated in published game builds. Atomic: Transition is not interruptable by other transitions when checked. Conditions: Transitions can have multiple conditions, based on different parameters- for instance, changing between idle and walk when speed is greater than 0.1
3: ANIMATOR CONTROLLER LAYERS
– The state machines used in Animator Controllers can be separated into layers. These are generally used for controlling different body parts. For example, the base layer could hold general walking and running animations, whilst a new layer would allow him to wave durig these animations.
– By default, there is only one layer, called Base Layer. This has only limited options. Click the ‘+’ symbol to add a new layer. All other layers have extra options, mostly to determine their weighting and when to play. Name is simply the layer name. Weight determines how much this layer will affect the final animation, with a slider from 0 to 1. This can be adjusted later in code with the SetLayerWeight function of the animator class. Mask is where you insert which avatar mask to use if you want to limit the animation to a certain body part. (These are discussed in more detail in part 3 of this tutorial series). Blending determines how the animations stack in the layers. Override will replace the base animation with that in the higher layers (for instance a wave will override what the arm is doing in a walk cycle). Additive will combine the animations of layers and blend them together based on weighting. (For example, a heavy breathing animation on top of a run animation when the character is tired). Sync Allows you to copy a State machine from one layer to another. This means that the animator will always be in the same State in both layers. You can then use weighting to shift between sets of animations in different layers.
4: ANIMATOR SCRIPTING
To activate transitions between states in an Animator controller, we need to be able to adjust the parameters which trigger them. We use the functions of the animator class to do this in code.
5: BLEND TREES
– Blend trees are used to blend between two animations, such as a walk and a run animation, or a walk forward and walk sideways animation. – Right click an empty space in the animator window and choose Create > New From Blend Tree. This creates a state which has a Blend tree as its Motion, instead of a single animation. Double Click this state to open the blend tree. In the inspector panel there are several parameters for the blend tree. Blend Type can be 1 dimensional or 2 dimensional. A one dimensional tree will have one parameter that affects which animation is played. The Parameter box lets you choose what parameter this will be. For example, to switch between walking and running, the most likely parameter would be speed. The Motion fields are where you will insert the animations the blend tree will use. Note that you can actually add another blend tree in one of these fields, but an easier way is to just use 2D blend type to allow multiple parameter use.
– Each motion in the Blend tree has is own parameters: Threshold, which determines the parameter values at which each animation will play (eg if walk was a speed of 5, run was 10, then a speed of 7.4 would be a 50-50 blend of the two animations) Speed, which sets the speed the animation should be played at relative to its import settings; and Mirror which will flip the animation left and right.
– Once you add more than one motion a blue graph will appear above to visualise how much each animation will blend within the threshold of the parameters values. You can scrub through this graph to see a preview of what the animation will look like for any given value of that parameter.
– 2D Blend trees can use 3 types of Blend. 2D Simple Directional is used when you have single animations for each directions, such as walk back, walk forward, left etc. 2D Freeform Directional is similar, but can include multiple animations in the same direction, such as walk forward, run forward etc. 2D Freeform Cartesian is used to blend animations that do not rely on a directional parameter, for example angular speed.
– Once you have selected your 2d blend type, a graph will appear, from which you choose an x-axis parameter and a y-axis parameter. For a 2d directional blend, your parameters could be Velocity.x and Velocity.z for example. One you have chosen your parameters, add animations to the motion fields, then adjust their thresholds to see them on the graph. The red dot on the graph can be moved to preview the animation.
6: ANIMATOR SUB-STATE MACHINE HIERARCHIES
– When Creating state machines in an Animator controller, things can get complicated very quickly. It can help to organise state machines into Hierarchies of Sub-State Machines. For example, all combat animations could be grouped together, or all airborne animations etc.To do this, right click on an empty spot in the State machine editor window, and choose ‘Create Sub-State Machine’. Note that state machines have hexagonal shapes, whereas regular states are rectangular.
– To move states into a Sub-State machine, simply select them and drag them onto the state machine icon. They will disappear into the state machine, and all transitions will now point to the state machine. To view the states, simply double Click on the state machine. To hide them again, click on the Up Node which will be orange and be labelled with the name of the parent layer.
– You can have more than one state machine, and they can even be nested inside each other. When adding new transitions to nested states, left click the state machine, and a dropdown list of states it contains will show up. Pick the required state from the list. Similarly, select the Up Node when adding transitions to states outside the current machine.
State machines also have green Entry Nodes and red Exit Nodes. Transitions into and out of state machines can be linked to these nodes as well as the Up Node
–

Comments