Tutorial: ZBrush – Hair and Fur
- Michael

- Feb 15, 2016
- 6 min read
There are several ways to create hair and fur in ZBrush. Each method has its own advantages and disadvantages, and unique visual style. Get familiar with each and know which will be better suited for a particular purpose.
1a: Simulated Hair with FiberMesh
In the Tool palette there is an option called FiberMesh. This can be used to generate realistic strand like hair on your models, or adapted to produce different effects such as tentacles, shaggy fur etc. It can be used for both long and short hair.
1: Mask off The part of your model where you want hair to appear (Ctrl + Click to add, Ctrl + Alt + Click to erase).
2: In the tools palette, click on the Fibermesh section. Click on Preview to add basic hair to your model. It looks pretty awful, so click on the Modifiers tab to start making it look better. Note that at this point we are not shaping or styling the hair, just producing the hair.
Max Fibers – This determines the density of the hair.
Length – Affects the length of the generated fibers. In order to look more natural, longer hair will need more segments in order to bend and flow correctly.
Length Variation – (LeV) This sets the variation in length between individual strands of hair.
Gravity – You can set the gravity of your hair to affect how it flows.
Segments – think of your hair as solid rods with flexible joints along its length – the more joints, the more the hair will flow. Fewer joints will result in spikier, straw like hair. Increasing the number of segments will make the hair flow more naturally, at the cost of processor power
3: There are plenty of other modifiers which can have subtle effects. Once you are happy, click the Accept button to convert your hair into a new subtool. Back In Fibermesh, be sure to activate ‘Fast Preview‘ mode to convert your strands from splines into actual geometry. The splines tend to look very fuzzy and pixelated, and so are hard to style.
4: Now we must groom the hair into position. We can do this by using the Groom brushes along with the move, pinch and smooth brushes.
1b: Fibermeshed Long Hair (with Polygroups)
Polygroup parts of your hair to easily produce nice parting lines, and to only maneuver selected areas when grooming. This is especially useful for long hair.
1: Enable polyframe, Switch texture map off and lower your subdivision levels so that polygroups are visible.
2: With the Lasso selection tool active, Press Ctrl + Shift + Alt to hide parts of the model. Select where you want hair to sprout from to hide this area.
NB: Ctrl + Shift + drag Will keep what you select visible, hiding everything else.
Ctrl + Shift +Alt + drag will hide what you select.
3: Press Ctrl + Shift and drag click the empty canvas – This will reverse the hidden and visible geometry, leaving only the scalp visible.
4: With just the scalp visible, Press Ctrl + W or Open Polygroups in the Geometry palette and click ‘Group Visible‘ to make the scalp one single polygroup.
NB: To adjust your scalp, hide it, hide the extra bits you want to include, then invert visibility again, and click ‘Group Visible‘ once more.
5: Now to create separate polygroups in the hair, use the lasso and Ctrl + Shift + Alt to hide small portions of the scalp, then click group visible. Keep doing this until all the scalp has been sectioned off.
6: In the Masking section of the Tool palette, click ‘Mask all’. This will add a mask to the scalp (but not the rest of the hidden geometry). (Alternatively you can just Ctrl + Click the empty canvas to mask/unmask all visible. This can also be used to invert masks.)
7: You can now unhide the whole model (Ctrl +Shift+ Click on canvas). You may need to shrink and sharpen your mask slightly so it doesnt extend beyond the polygroups.
8: Go to the Fibermesh palette and click preview to start producing your hair. Set the strands as you want them and click the accept button to create your hair subtool.
9: The new hair subtool will have inherited the polygroups from the scalp it grew from. Use the tips below to help style the hair.
Grooming with Polygroups
1: Ctrl + shift + Click on a polygrouped section of hair to isolate it and hide the rest.
2: Use the grooming brushes to style it as desired. The GroomHairBall brush is useful for gathering the hair in each polygroup into condensed balls, allowing you to work with other groups easier.
3: Once done, Ctrl + Shift + Click on an empty canvas space to make everything visible again. Repeat this process until everything is styled. It tends to be easier to work from the neck up, i.e the lower layers of the hair first.
4: Remember you can also style individual polygroups by isolating one, masking it with Ctrl + Click on the canvas, making everything visible again, then inverting the mask.
5: Use the regular Smooth brush to remove any tangles created as you style the hair. Smoothing at the tips will shorten the hair.
General Grooming Tips
The basic fibermesh hair is pretty shapeless, so you have to groom it to the desired style. ZBrush has a selection of hair grooming brushes specifically for this purpose.
Different brushes have different effects – for example, there is a GroomHairLong brush which produces better results for long hair.
There are also brushes to colour the root, mid or tip of your hair strands.
Use the Move brush or GroomLengthen to pull and lengthen your hair. Note that this will not increase the number of segments. The move brush is also handy for moving the hair closer to geometry if it looks like it is floating on top of it.
If you have hair of different lengths, these should all be created as separate masks with fibermesh, and saved as separate subtools. For example a closely shaved head with a mohawk on top.
This allows the different sections to have different properties, such as colour, length, gravity etc.
Use the regular Smooth brush to remove any tangles created as you style the hair. Smoothing at the tips will shorten the hair.
Trimming Hair
If you made your fibermesh hair too long, you can trim it back to the required size.This is useful for things like fringes. Although you can shorten it with smoothing, a quick, uniform way is shown below.
1: Have your section of hair extended away from all other geometry, including any other hair you dont want cut.
2: Hold Ctrl + Shift, and select the ClipCurve brush
3: Draw a line across where you want the hair to be trimmed. (You may need to hold alt to delete the correct side, depending on how you drew the line.)
4: If the result is a little glitchy, use the smooth brush on the tips to eliminate any rogue polys that were created.
2: Sculpted Hair
Sculpted hair is that which is just directly sculpted onto the model, with the textures and normals being what gives it a hair like appearance. This is best used for low poly game design, or for low poly background characters who dont need much detail. Use alphas to ‘rake’ multiple grooves into the head with each brush stroke. The ‘Default Head’ Tool in Zbrush is a good example of this style.

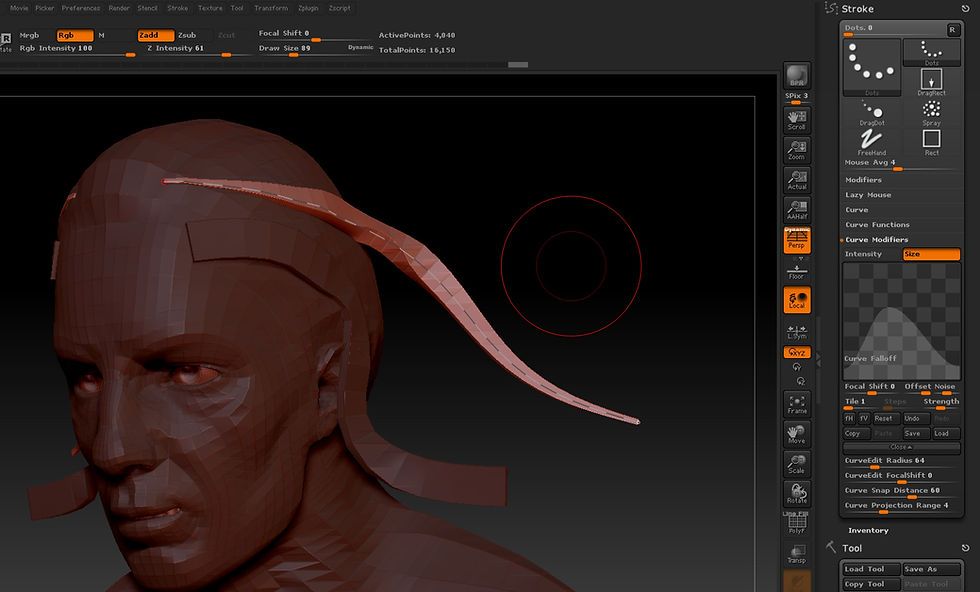
3: Stylised Hair using Curve Brush
If you want to create a more cartoony, stylised form of hair, a cool technique is to use the Curve Strap or Curve Tube brush. Steve James has a great video on this, but it is summarised below:
Creating first strand
This brush is used to create a strip of mesh with either a rectangular or round cross section respectively, on the surface of your existing mesh. Simply draw the curve as you want it then the mesh will be automatically generated. Note that you will need to freeze or delete your subdivision levels to do this.

Brush size will adjust the width of the strip whilst z intensity will adjust it’s height or thickness.
For a more hair like shape, go to the Stroke palette and open Curve Modifiers. It defaults to a straight line graph, but if you activate the size button then drag the left and right to zero, then increase the middle into an arc shape, your meshes created with the curve brushes will taper at the ends more like hair.
Positioning first strand
To change the shape of a created line, simply adjust your brush settings then tap on the spline controlling the mesh.
You will also see a green circle when you hover on the line. Click and drag to move the curve from this point
Back in the Stroke palette, if you click the Curves section, you can check the ‘Lock Start’ button, so that the ‘root’ of your hair will stay in place while you reposition it.
Creating next strands
When you place a curve mesh, the next time you go to draw one you may notice that teh first disappears! This is because you may not have ‘confirmed’ the first hair and are constantly redrawing it. To confirm placement of your first hair mesh, simply click on the main mesh that it is attached to. The curve spline in it’s centre will disappear and the mesh will be finalised. Now you can create your subsequent strands.
The hair will be part of the base tool, but each strand will be given it’s own polygroup,so they are easily moved to their own subtool where they can be manipulated and subdivided further.
Tip: This brush is also useful for creating the base mesh of other elements such as horns or tentacles.

Comments